

Ouch! The Ultimate Guide to Wrapping a Sprained Finger
What to Do When You Sprain a Finger: Quick Guide

Knowing how to wrap a sprained finger correctly can mean the difference between a fast recovery and weeks of lingering pain. Whether it happened catching a basketball, taking a bad fall, or jamming your finger in a doorframe — it hurts, and you want to fix it fast.
Here's how to buddy-tape a sprained finger in 5 steps:
- Check for serious injury — If the finger looks bent, deformed, or numb, skip home treatment and see a doctor.
- Gather supplies — You'll need athletic tape (about 1.25 cm wide) and a small piece of gauze or cotton padding.
- Place padding between fingers — Slide the gauze between the injured finger and the adjacent (neighboring) finger to protect the skin.
- Apply two strips of tape — Wrap one strip between the first and second joints, and a second strip between the second and third joints. Do not tape over the joints themselves.
- Check circulation — Press the fingertip. Color should return within 3 seconds. If it doesn't, loosen the tape immediately.
A Grade 1 sprain can start feeling better in as little as 3–5 days. More severe sprains may take several weeks.
Finger sprains are one of the most common sports injuries — and one of the most mishandled. Too many athletes either ignore them entirely or wrap them so tightly they cut off circulation. Both mistakes slow recovery and can make things worse.
The good news? With the right technique and supplies, wrapping a sprained finger at home is straightforward and effective.
I'm Josh Key from SHIELD Health & Fitness, and through years of working with elite athletes — from Spartans to professional skiers — I've seen how proper taping techniques and quality tape make a real difference in how fast athletes get back to performing. In this guide, I'll walk you through everything you need to know about how to wrap a sprained finger safely and effectively.
Identifying a Sprained Finger vs. Fracture
Before you grab your roll of tape, you need to know exactly what you are dealing with. Treating a simple sprain at home is highly effective, but attempting to wrap a fractured or dislocated joint yourself can cause permanent damage, alignment issues, and long-term joint stiffness.
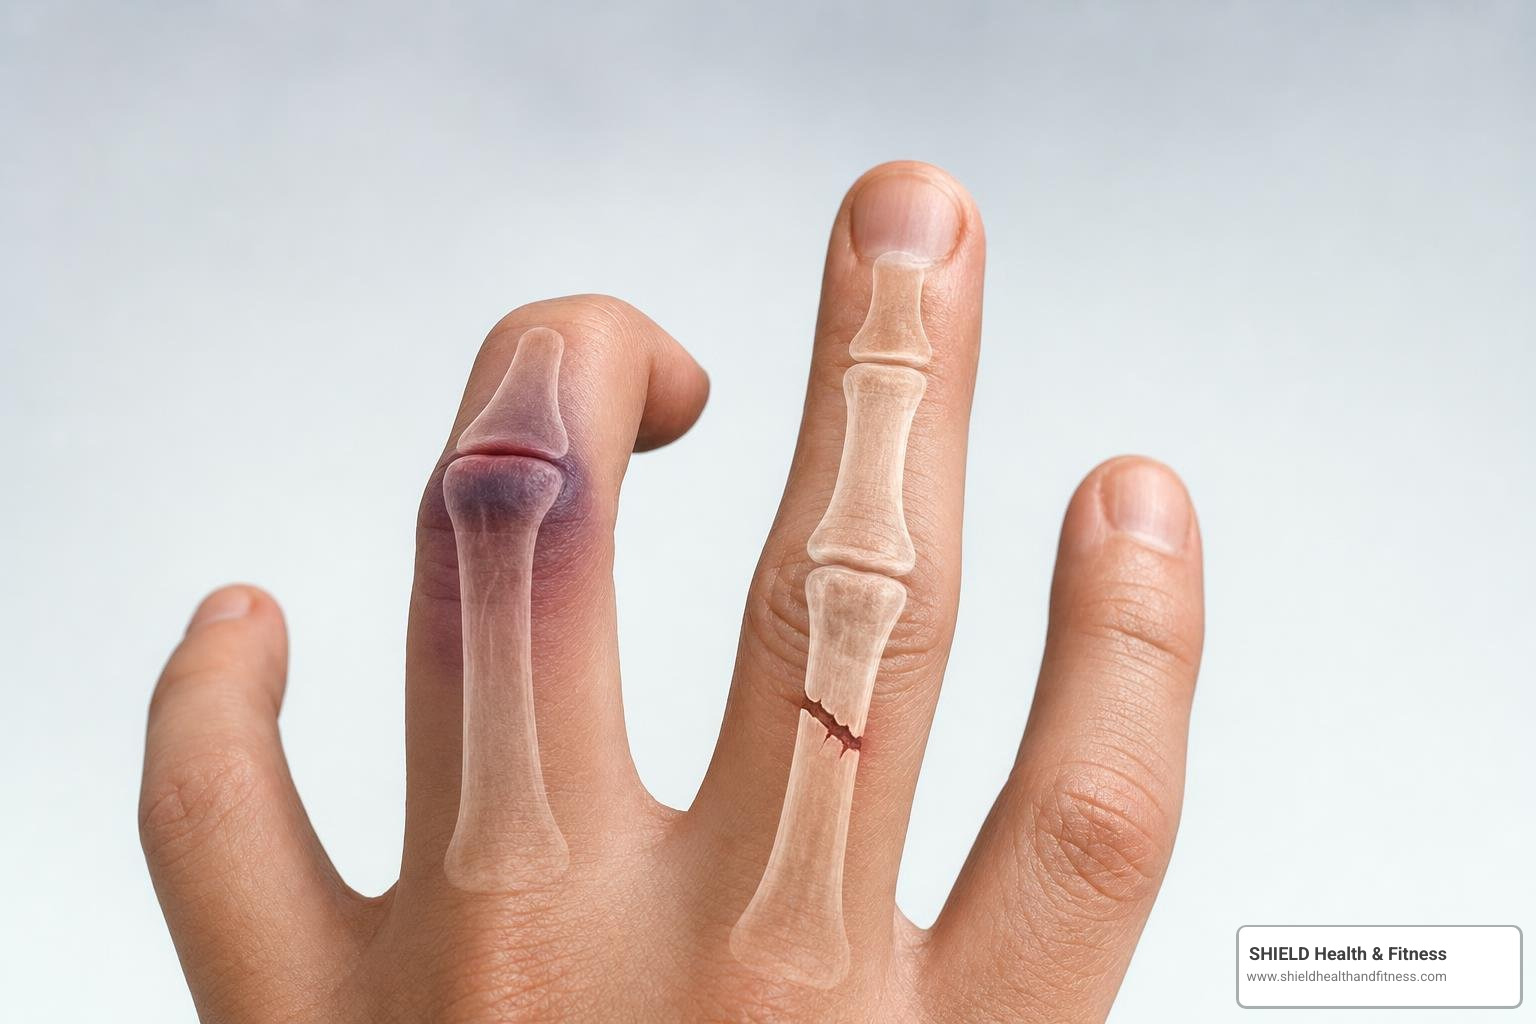
To understand what is happening inside your hand, it helps to look at the anatomy. Your fingers are made of small bones called phalanges, which are connected by joints. Ligaments are the tough, fibrous bands of tissue that hold these bones together and keep the joints stable.
When you "jam" or force a finger past its normal range of motion, these ligaments stretch or tear. This is a sprain. If the bone itself cracks or breaks, that is a fracture. If the bones are forced completely out of their normal alignment at the joint, you are dealing with a dislocation. For a deeper dive into diagnosing these injuries, check out this comprehensive Clinical guide on sprained finger symptoms and diagnosis.
Symptoms of a Sprained Finger
Finger sprains are classified into three distinct grades based on the severity of the ligament damage:
- Grade 1 Sprain (Mild): The ligament is stretched but not torn. You will experience mild pain, slight swelling, and minor stiffness. A Grade 1 sprain will start to feel better in 3–5 days and can successfully recover in 2–4 weeks.
- Grade 2 Sprain (Moderate): This involves a partial tear of the ligament. You will notice more significant pain, localized swelling, bruising, and a noticeable loss of motion. The joint may feel slightly unstable.
- Grade 3 Sprain (Severe): This is the most severe sprain, resulting in a complete rupture of the ligament. The joint will feel highly unstable or "loose," and you will experience severe pain, immediate swelling, and deep bruising. A grade 3 finger sprain can take several months to heal.
One important thing to keep in mind during your recovery: in some cases, the joint can look swollen for up to one year post-injury. Do not panic if your joint remains slightly larger than its neighbor long after the pain has gone; this is a common tissue response to ligament trauma.
When to See a Doctor
While buddy taping is an incredibly effective home remedy, it is not a cure-all. You should skip home treatment and seek immediate professional medical care if you notice any of the following "red flag" symptoms:
- Obvious Deformity: If the finger is crooked, resting at an unnatural angle, or has a visible bone-like bump.
- Numbness or Tingling: If the finger feels cold, pale, or has a "pins and needles" sensation, which indicates nerve or blood vessel compromise.
- An Open Wound: Any cut or laceration near the injured joint increases the risk of bone or joint infection.
- Inability to Move the Finger: If you cannot bend or straighten your finger even slightly, this could indicate a ruptured tendon (such as mallet finger) rather than a simple sprain.
- Severe, Unremitting Pain: Pain that does not improve with rest, ice, and elevation, or that prevents you from sleeping.
How to Wrap Sprained Finger: Step-by-Step Buddy Taping
When a doctor or athletic trainer decides to splint a minor finger sprain, they often choose a technique called "buddy taping." This method dynamically splints the injured finger to an adjacent, uninjured finger.

Buddy taping is brilliant because it allows your fingers to bend and grip (flexion and extension) so you can go about your day, while completely preventing the sideways movement and twisting that would re-injure the healing ligament. You can read more about this standard clinical approach in these Professional guidelines on buddy-taping fingers.
Essential Supplies for Finger Taping
To do this right, you cannot just grab standard household duct tape or packing tape. You need materials designed for skin contact that provide rigid support without losing their grip when you sweat.
Here is what you should have in your first-aid kit:
- Rigid Athletic Tape: You want narrow tape. Standard 1.5-inch athletic tape is too wide for fingers, but you can easily tear it lengthwise to create custom 0.5-inch (1.25 cm) strips. For the absolute best results, we recommend using high-tensile Sports Tape for Fingers or heavy-duty Athletic Tape for Injuries.
- Specialty Sports Tape: If you participate in high-impact or high-friction sports, you might want specialized options like extra-sticky Combat Tape or flexible BJJ Finger Tape, which are designed to survive sweat, chalk, and intense gripping.
- Padding: A small piece of cotton gauze, foam, or felt. This is placed between the fingers to prevent skin-on-skin friction.
- Shears: A pair of sturdy medical scissors to cut the tape cleanly.
Step-by-Step Guide on How to Wrap Sprained Finger Safely
Follow these steps carefully to ensure your wrap provides maximum stability without causing secondary issues:
- Select the "Buddy" Finger: Choose the uninjured finger next to the hurt one. As a general rule, tape your ring finger and pinkie finger together, or your index and middle fingers together. Taping the ring finger to the pinkie is highly recommended because it preserves your hand's natural gripping strength.
- Prep the Skin: Wash and dry both fingers thoroughly. If your skin is oily or sweaty, wipe it down with a little rubbing alcohol to ensure the tape sticks.
- Insert the Padding: Cut a strip of cotton gauze or soft padding to fit between the two fingers. This padding is absolutely crucial; without it, moisture gets trapped between your fingers, leading to skin maceration (softening and breaking down of the skin), blisters, and potential infection.
- Apply the Proximal Wrap: Cut a strip of tape long enough to encircle both fingers twice. Wrap this strip firmly around the base of the fingers, between the hand (MCP joint) and the middle knuckle (PIP joint).
- Apply the Distal Wrap: Take a second strip of tape and wrap it around the fingers between the middle knuckle (PIP joint) and the fingertip knuckle (DIP joint).
- Perform a Circulation Check: Once the tape is secure, gently pinch the fingernail of your injured finger for two seconds. The nail bed will turn white. Release it; the healthy pink color should return within 3 seconds. If it takes longer, or if your finger feels cold, numb, or starts to throb, peel the tape off and reapply it slightly looser.
For a visual walkthrough and further tips, you can review these Step-by-step buddy taping instructions.
How to Wrap Sprained Finger with Proper Joint Positioning
The way you position your finger joints during the taping process matters immensely. If you tape a finger in a completely straight, rigid position, you risk long-term joint stiffness that can take months of physical therapy to resolve.
For standard collateral ligament sprains, you want to tape the fingers in a position of slight flexion (a very gentle, natural curve). This keeps the ligaments relaxed and comfortable while allowing you to maintain basic hand function.
However, different injuries require different splinting alignments. For example, if you have a tendon injury at the fingertip (like mallet finger), the DIP joint must be held in full extension or even slight hyperextension. If you are dealing with more severe joint instability that requires a rigid splint rather than simple tape, you can find precise clinical instructions on joint positioning in this guide on How To Apply a Fixed Finger Splint.
Aftercare, Recovery Timeline, and Preventing Complications
Taping is only half the battle. To ensure a complete, pain-free recovery, you need to combine your wrap with active rehabilitation and proper skin care.
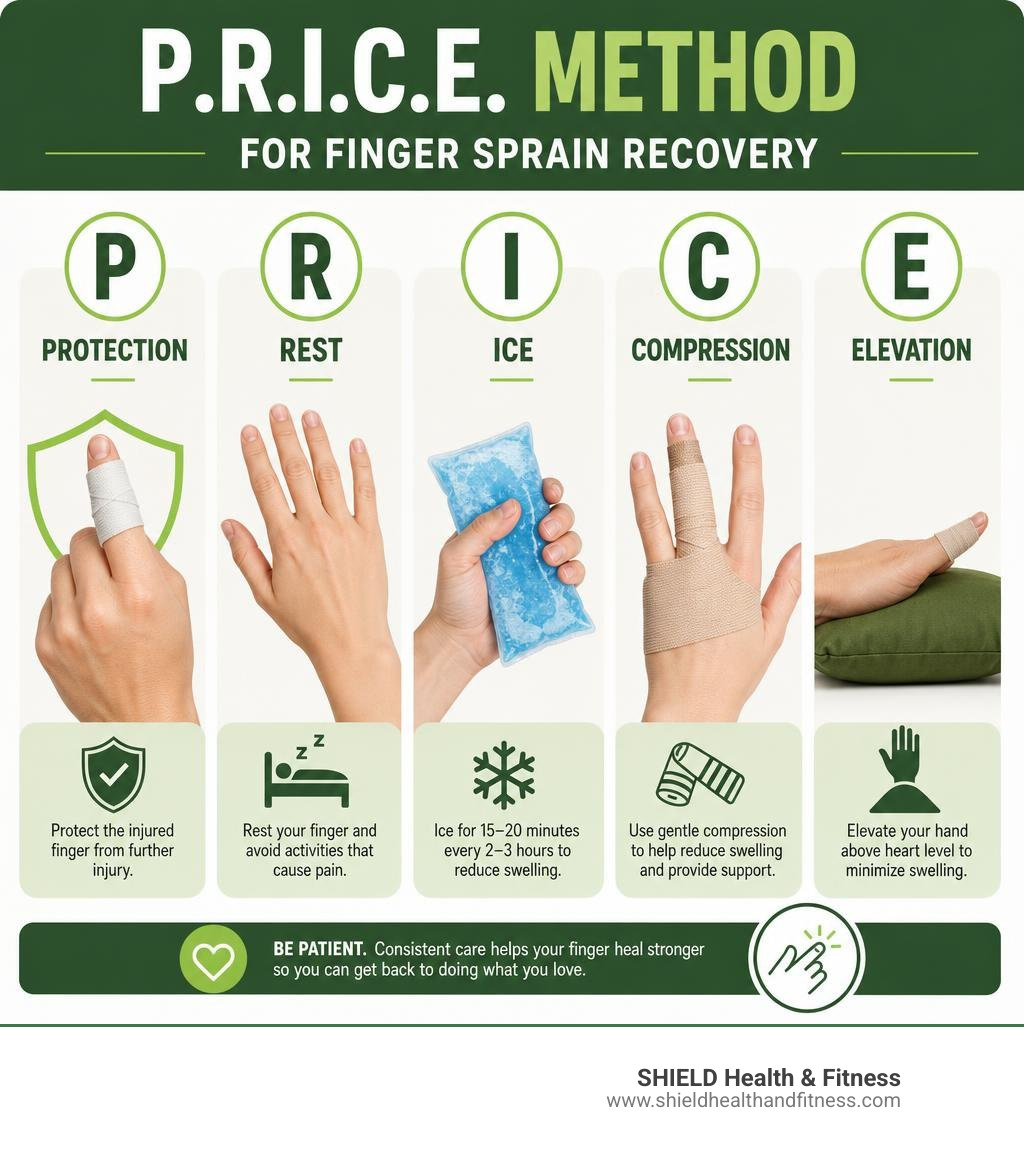
The P.R.I.C.E. Protocol and Exercises
During the first 48 to 72 hours after your injury, you should strictly follow the P.R.I.C.E. protocol:
- Protection: Protect the joint from further impact by keeping it wrapped or buddy-taped.
- Rest: Avoid using the injured hand for heavy lifting, typing, or sports.
- Ice: Apply ice packs wrapped in a thin towel for 15–20 minutes every two to three hours. Alternatively, use cold water immersion (dipping your hand into a bowl of ice water). Cold water immersion is often more effective than ice packs for fingers because the cold water completely surrounds the irregular, curved shape of the joint.
- Compression: The buddy tape itself acts as a light compression wrap to manage swelling.
- Elevation: Keep your hand elevated above the level of your heart as much as possible, especially when resting or sleeping, to let gravity drain excess fluid away from the hand.
Once the acute swelling and sharp pain begin to subside (usually after a few days), you must start gentle rehabilitation to prevent joint permanent stiffness. You can perform simple range of motion and grip strength exercises:
- Passive Bending: Gently use your uninjured hand to bend and straighten the sprained finger to its comfortable limit.
- Squeeze Exercises: Place a soft object—like a tennis ball, a racquetball, or even a rolled-up clean sock—in your palm. Gently squeeze it 10 times every hour.
- Finger Spreads: Place your hand flat on a table and gently practice spreading your fingers wide and pulling them back together.
Avoiding Common Taping Mistakes
To keep your recovery on track, watch out for these incredibly common taping blunders:
- Wrapping Too Tight: This is the number one mistake. Overly tight tape acts like a tourniquet. If your finger swells after you tape it, the wrap will become dangerously tight. Always double-check your circulation.
- Taping Over the Knuckles: Never place tape directly over the PIP or DIP joint lines. This locks the joints completely and leads to severe stiffness. Keep the tape strictly between the joints.
- Neglecting the Padding: Skipping the gauze pad between your fingers will quickly lead to painful blisters, skin irritation, and pressure sores.
- Leaving Tape on Too Long: You must change your tape and padding daily. Sweat and water from washing your hands will get trapped under the tape, creating a breeding ground for bacteria. Take the tape off daily, wash and dry your skin thoroughly, inspect it for redness or sores, and apply fresh tape.
Frequently Asked Questions
How long should you keep a sprained finger wrapped?
For a mild Grade 1 sprain, you should keep the finger buddy-taped for about 2 to 4 weeks, or until you can move the finger through its full range of motion without pain. If you are using buddy taping for minor, stable fractures or dislocations, the taping duration usually lasts 2 to 4 weeks, though full recovery of the bone and deep tissues can take up to 5 months.
Can you use kinesiology tape for a sprained finger?
Yes! Kinesiology tape is a fantastic option if you want dynamic support rather than rigid immobilization. Unlike standard rigid athletic tape, kinesiology tape stretches. When applied correctly, it gently lifts the skin, creating microscopic spaces beneath the tissue. This reduces pressure, promotes lymphatic drainage, and dramatically helps with swelling and bruising reduction. It is highly favored by athletes who need to retain maximum joint mobility.
How do you know if a sprained finger is actually broken?
The only definitive way to know if a finger is broken is to get a professional medical evaluation and an X-ray. However, strong signs of a fracture include immediate, intense bruising, extreme swelling, an obvious crooked or deformed shape, and the inability to move the finger at all. If you suspect a break, do not attempt to self-treat; see a doctor immediately.
Conclusion
A sprained finger might feel like a minor inconvenience, but taking the time to treat it properly will save you from chronic joint pain and stiffness down the road. By mastering how to wrap a sprained finger using the buddy-taping technique, protecting your skin with proper padding, and following the P.R.I.C.E. protocol, you can ensure a safe and speedy return to your favorite activities.
At SHIELD Health & Fitness, we believe that high-quality recovery starts with high-quality gear. Our professional-grade, American-made athletic tapes are trusted by elite athletes and pro teams across the country to provide reliable, long-lasting support. If you want to keep your hands protected during training, Shop professional volleyball and athletic tapes today and give your joints the defense they deserve. Keep your hands safe, wrap them smart, and we will see you back in the game!
